Showing posts with label tutorial. Show all posts

Monday, February 29, 2016

TUTORIAL : GOLDEN MOON MAKEUP LOOK

Monday, February 29, 2016


How are you guys?!

Today, I’m going to share you another makeup tutorial. Actually this is my makeup look when I celebrated Chinese New Year’s Eve. As we know, 2016 is a year of the Monkey, so this is a monkey’s makeup look, LOL. NO lah... I think this makeup look can be used for party or night makeup not only for CNY’s eve, though I used gold colored which is very identical for CNY celebration. Anyway, gold represents the prosperity and fortune in Chinese culture, also it is the lucky color for this year.  Well, actually gold colored makeup never die, so I decided to make this tutorial. I call it Golden Moon makeup look#cough...

I must stop bla bla blaa... Let’s start!


FACE :

I should give my skin more moistness since it’s getting colder during this rainy days. I keep the cotton pads soaked with toner on my face, especially on both of my cheeks. It helps me a lot to moisten my skin.

Apply concealer to brighten eyebags and cover up blemishes. Next is using foundation or BB cream. Here, I’m using my Laneige BB Chusion. Gently pat it to the entire of your face and don’t forget your neck too. I finish it with translucent loose powder.

To add sparkling look, I use glittery powder as highlight, focus on my cheekbones.


EYES :

As I mentioned before, I use golden eyeshadow on the whole eyelids and outer ½ of bottom lash line. Apply it lightly. Then draw a thick eye cat using brown eyeliner. I secondly apply the shimmering gold eyeshadow, thicker on the center of eyelid. For the eyeliner to stick out, re-apply a gel liner on the outer rim of the eye and as long as your under waterline. Draw straight line on the outer of your lower lash line using the same brown eyeliner. Give a highlight effect to the eye by applying pearly eyeshadow on the inner corner of the eye.

Draw your eyebrow following your natural eyebrow shape. Then apply brown eyebrow mascara. I like to use lighter eyebrow color than my hair color. Today I chose brown redish color.


I’m going to add bling bling to the fake lashes. Here’s the tip :


Put a thin layer of glue on the fake lashes (you can use a clear eyelashes glue). Then scatter glitter or sparkling eyeshadow powder over it and shake it off. Taadaa! Bling bling eyelashes is ready to used.


Use your bling bling eye lashes carefully and curl it together with your natural eyelashes. Apply mascara. Done.


LIPS :

Since I want my eye makeup to pop out, I chose a soft color lipstick. I used Innisfree Cream Mellow No. 3. It has cream coral color and creamy texture. Complete the lip makeup with clear or soft pink lipgloss.

For finishing touch, use a pink cream blusher on your apple cheeks. You can also use your lipstick as your blusher as well by dabbing it on your cheeks.


Your makeup is done! Yes, it’s so simple, right?

I let my hair apart and brought it to the one side. For cute look, I used a flower hairpin. And yeah, I still used Cheongsam although it’s not a CNY’s day anymore, hahahaa.


Products I used:

Face:

Skinfood Rice Concealer Tip

Laneige BB Cushion Pore Control

Innisfree No Sebum Mineral Powder

Etude Lovely Cookie Blusher - #2 Strawberry Choux


Eyes:

QL Eyeshadow

Dolly Wink Liquid Liner Brown

Tony Moly Backstage Gel Liner - #2 Brown

Dolly Wink Eyelashes - #10 Sweet Cat

Maybeline Hyper Curl Mascara - Black


Lips:

Innisfree Cream Mellow Lipstick - #3 Cream Coral

Nyx Gloss - #11 Strawberry


Well guys, I wonder if you have other makeup ideas using gold colored too. Let me know by leaving your comments below. I’ll be glad to know that:>

Btw, better late than never to say in this monkey’s year, Wishing you a wonderful and prosperous new year with lots of happiness!


THANK YOU FOR READING AND SEE YOU ON NEXT POST!
HAVE A GREAT DAY!


Monday, February 1, 2016

TUTORIAL : AOA SEOLHYUN FOR CECI MAGAZINE INSPIRED MAKEUP

Monday, February 1, 2016


Hola Beauties!


Sorry for neglecting this blog too long. I was so damn busy with my new life, tehee. Well, actually I just spend whole day with eating and sleeping and watching korean dramas mehh.


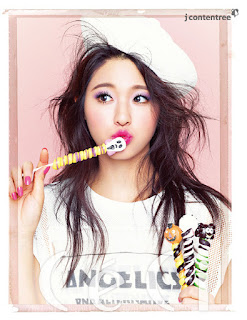
Anyway just for killing my boring days, I’ve browsed lotta Idol pictures and found an interesting photo of AOA Seolhyun for Ceci Magazine. She’s pretty huh?
I love since the makeup looks so sweet and fun. Seolhyun is so beautiful with this Candy Girl look. So, I decided to recreate her beauty makeup and share it with you all.
Should we begin?

 
Source : Google


 First of all, skin care is a must ladies. A healthy skin will help you to get a perfect makeup. With moist skin, you can blend and put your makeup easier and make it long last. Already done with your skin care? Now moving on.


Use your fave BB cream or foundation to get radiant skin. To be honest, I prefer BB or CC cream than foundie since it has lighter formula and consist of skin care. Perfect for daily usage laa. But I found that some BB cream of mine has thick consistency as butter, like most of Etude Precious BB series#sigh...
To solve that I use face oil. My favorite is Innisfree Green Tea Seed Oil. I love it like crazy. I mix one or two drops of face oil with my EH BB cream so the texture of Bbcream itself will turn to be more watery and easier to be blended. It prevents cakey result too.
Don’t forget to use your bestie concealer to cover up any imperfections and get ready for flawless skin. Yoohoo!
It’s optional to set with loose powder or not. If you have dry skin, better skip this step. If you want to use powder, focus on the T zone area only because we still want to get the glowing skin for this look.
Next for the eye makeup which is look so sweet and girly.


Start from eyebrow. Since Seolhyun’s brows look straight and natural, I just apply eyebrow mascara in brown color following my natural brow shape.
Apply pink eyeshadow all over your eyelid. Then get your purple eyeshadow and swipe on the outer corner of your lid until the color shows off. Blend the pink and purple eyeshadow well. Use white eyeshadow on the inner corner and smudge it through the lower lash line.
I used black color for eyeliner. Gel or liquid type, choose your favorite. Finish the eye makeup by using fake lashes and don’t forget to apply mascara on your both upper and lower lashes. Btw, I didn’t use bottom fake lashes, LOL. Honestly, it should be better if you use it for this look laa.


Next for the lips. I’m going to use my Peripera lip crayon. Before that, apply lip concealer or BB cream over your lips to tone down your lip color. Choose pink fuchsia lipstick and make it glossy with lipgloss. Perfect.
Unlike mostly Kpop Idol, Seolhyun has pretty tan skin which is look healthy and sexy. So I put some efforts to shading and highlighting, phew...


Almost forgot, apply pink blush on your cheeks too girls. And you’re done!
Please don’t compare my silly face with Seolhyun’s, whooaa... She’s so far prettier la!
I try to get Seolhyun’s hair do but I failed, LOL.
Anyway, since it’s my first time making makeup tutorial, please forgive all the imperfections. I know, this tutorial is not clear as yet, but surely it’s hard to take pictures step by step while working alone, especially for a beginner like me #slap...
I hope next time I can make better makeup tutorial. 

Thank you for reading my tutorial. See you on my next post!


Thursday, October 15, 2015

CUTIE PINK FLORAL NAIL ART

Thursday, October 15, 2015


Hi there!

Today’s post is for nail art tutorial. I’m not a pro nail artist actually, so forgive me for this amateur tutorial. Well, at least we’re gonna have fun ya?! Tehee...


In this tutorial I use Pokari and Just Miss nail polish bought from Stoberi and Naughty stores in my town. It’s cheap and I think it’s a local product. But I found that the quality is pretty good so... let’s get started!

I like soft and pastel color for my nails, so I choose soft pink color using Pokari Nail Polish 02 in Strawberry Milk and for bling bling effect, I use Just Miss glitter nail polish number 107 and other brand, idk what the name, in pink glitter color.


First, make sure that the nails are clean and healthy. 


Then I start applying the Pokari Strawberry Milk. I’m so in love with this color because it’s so light and sweet color. Makes my nails look bright and lovely. 


Next, I put the pink glitter nail polish on my point finger’s nail and apply the silver glitter one on half of my other nails. It’s optional, I mean you can decorate and use the nail polish like whatever you want.


Since I can’t draw on nails properly, so for the flower decorations I use Nail Art Sticker, choose pinky flower pattern. Using nail art stickers is so easy. Just detach them and patch on your nails. 
And tadaa...you have a beautiful art on your nails just in seconds!


But you must be careful when you detach them or you will be ripped them as it’s so small and thin in size.

You can choose 3D nail sticker to get more beautiful art like when you have Acrylic Nail Art in nail salon.

Play your creativities gals. You can put the flower pattern anywhere you like. And the last step, don’t forget to use top coat for making your nail art long last and more glossy.


Well, sometimes we don’t have to spend a lot of money in nail salon to get a beautiful nail art. We can get the attractive nail look just by using those cheap tools though. We don’t have to go to the nail salon and do it in home. I’m sure it gives us an exercise to improve our creativity too gals. And yeah it’s cheap, easy and fun!

Thanks for reading guys. How’s your way to have fun with your nails? Tell me on the comment box ya. I’d like to read that. See you in next post.


XOXO
SAYCINTYA Beauty & Fashion Blog © 2014